How do I install the Epson Universal Print Driver (PCL) in Windows?
-
See below.
Installing the Epson Universal Print Driver - Windows
The Epson Universal Print Driver supports multiple printer languages, such as PCL and ESC/P-R, and can be installed on a Windows computer.Note: Make sure your product is turned on and connected to the same network as your computer before installing the printer software. Depending on your model, not all printer languages may be supported.
- To download the EPSON Universal Print Driver file, visit epson.com/support (U.S.), epson.ca/support (Canada), or epson.com.jm/support (Caribbean) and select your product.
- Double-click the downloaded package.
- Follow the on-screen instructions until you see this screen:

- Select Yes: Network connection and click OK.
Note: Select the Set Default of Printer Control Language to PCL6 checkbox if you want to set the default printer language to PCL6. Leave this option deselected to set the printer language to ESC/P-R. (You can change this setting later as needed.)
After the software finishes searching for products, you see a screen like this:

- Do one of the following:
- If you are installing one product, make sure Add EPSON Universal Print Driver is selected and continue with the next step.
- If you are installing more than one product, select Add found printers and go to step 9.
Note: You can customize and filter your product search results by clicking Display Settings.
- Open the Select a port to connect a printer menu and select an existing printer port, if necessary. Otherwise, skip this option to create a new port automatically.
- Select the product you want to install from the Found Printers list.
Note: Deselect the Set as default printer checkbox if you do not want the product to be set as your default printer.
- Click OK, then skip the remaining steps.
- If you are installing more than one product, select the products from the Found Printers list and click Add to Printer Folder.
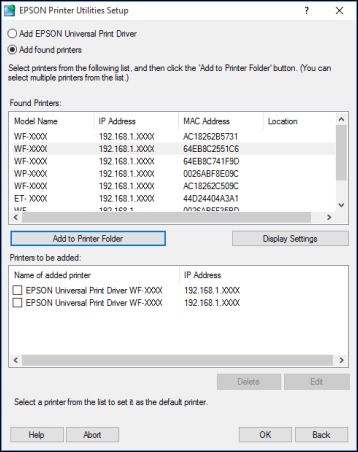
The selected products appear in the lower section of the screen.
- Select the checkbox next to the product you want to make your default printer, if necessary.
- Click OK.
Wi-Fi or Wired Networking