How do I add a network product if the Epson Universal Print Driver is already installed in Windows?
-
See below.
Adding Network Printers - Epson Universal Print Driver - Windows
You can use the Epson Universal Print Driver to find and add network printers.- Do one of the following:
- Windows 10: Click
 and select
  (Settings) > Devices > Printers & scanners. Select EPSON Universal Print Driver and select Manage > Printer properties.
 - Windows 8.x: Navigate to the Apps screen and select Control Panel > Hardware and Sound > Devices and Printers. Right-click EPSON Universal Print Driver and select Printer properties.
- Windows 7: Click
 and select Devices and Printers. Right-click EPSON Universal Print Driver and select Printer properties.
 - Windows Vista: Click
 and select Control Panel. Click Printer under Hardware and Sound, then right-click EPSON Universal Print Driver and select Properties.
- Windows 10: Click
- Click the Optional Settings tab. You see this window:

- Click Network printer search.
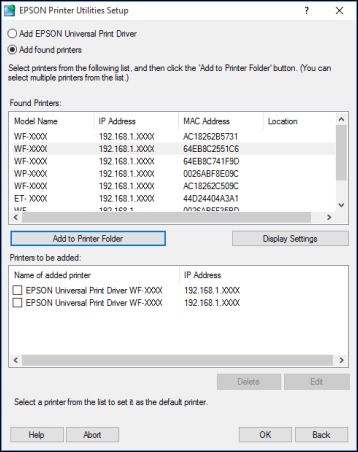
- When you see the search results, select Add found printers. You see a screen like this:

- Select the printer or printers you want to add.
- Click Add to Printer Folder. The selected printer or printers appear in the lower section of the screen.
- Select the checkbox next to the product you want to make your default printer, if necessary.
- Click OK.
- Do one of the following:
Published: Jun. 27, 2019
Was this helpful? Thank you for the feedback!